
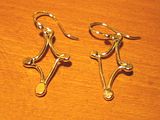
These earrings are enjoyable to make and lend themselves to a variety of designs. And, since this is my first tutorial, I'm counting on you guys to give me some constructive feedback.
Important Note: This tutorial is written for those with experience in the use of a torch and the knowledge of the safety measures that come with using it.
Materials:
- 16 gauge round, fine silver wire
- 20 gauge round, fine silver wire for the earwires, or you can use ready-made ones from your jewelry supply shop
- 9/8 inch diameter hardwood dowel
- Good quality flush cutter
- Torch (I use the butane microtorch...also used for creme brulee)
- Soldering block
- Wooden block with a 1/4 inch mandrel fixed into it (you can use a 1/4-inch screw and saw off the top like I did)
- 1 narrow-diameter nail, approx. 2mm
- Jeweler's hammer
- Steel block
- Tumbler with steel shot and original Dawn dish liquid
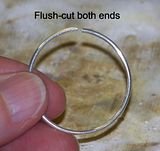
- Wind the 16g wire around the 9/8-inch dowel twice to make 2 rings. Slide the coil off . Cut two rings with a flush cutter.
- Now look at the opposing ends on each ring you just cut. One end is flat across, the other is in a wedge or pointy shape. You need to cut this pointy shape so it is also flat across. Use the flat side of the flush cutter to cut this end flat, or flush (you don't need to cut in too much).
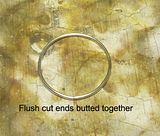 Butt these ends together to form the ring. Make sure there aren't any gaps. Place carefully on the soldering block (take your time with this) and fuse this joint closed. Let the ring cool on its own. Side Note: If you're not sure how to fuse, I highly recommend an online course by Iris Sandkuhler of Sandkuhler Studio called "Fused Loop Pendants and Stackable Rings". That's how I learned, and I've been having a blast with fusing ever since.
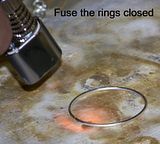
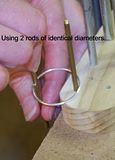
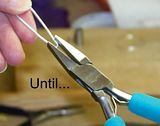
- With two thin, metal rods of the same diameter, stretch the ring into an oval shape.
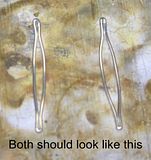
 Squeeze one end of the oval together with flat-nosed pliers until the sides touch each other. Squeeze the other end together, but just before the sides touch each other. This will be the end that hangs from the earwire.
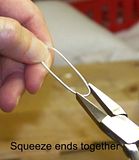

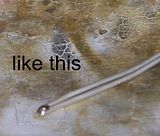
 Use the torch to form a ball at the end where the sides are touching each other. It's best to do this with the earrings next to each other so you can try to make the balls approximately the same size. Let them cool on their own.
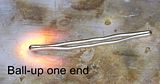
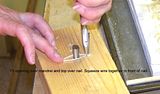
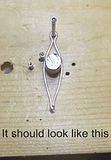
 Gently pry the sides apart and fit the open shape over the 1/4-inch mandrel. Pound the narrow-diameter nail through the earwire end. Just in front of the nail, squeeze the wire together to shape the hole for the earwire. Gently pull out the nail, and pull the earring off of the mandrel.
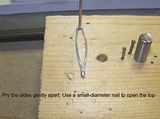
 Hammer the balls on both sides against the steel block until they are to your liking. This step really shines them up.
 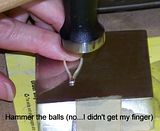 Add the earwires.
- Place the earrings in a tumbler with some steel shot, water just 1/2 inch above the shot, and a squirt of the original Dawn dishwashing liquid. Tumble for as long as you want. I tumbled mine for around 6 hours total, and they were nice and hard.
- Alternate Finish: If you prefer, or if you don't own a tumbler, you can hammer the entire earring to harden it. This will give it a lot of shine and flash.
Looks good!
ReplyDeleteDo you use the microtorch for sterling as well? How does it work for you?
Thanks...I use mostly fine silver since I want immediate gratification. No filing or sanding off firescale. Just throw it in the tumbler or hammer a shine onto it. The microtorch will ball-up the sterling just fine, but there's a lot of extra work getting that firescale off.
ReplyDeleteThis makes it tempting to buy some equipment and try to make jewelry. It doesn't look as hard as I though!
ReplyDeleteThere are easy ways and hard ways to make jewelry. I prefer the easy ways since I have a busy life (who doesn't!) and I'm not willing to give up my addiction to jewelry making...oh yeah, did I mention it's highly addictive?
ReplyDeleteOnce you make your first piece, you're hooked!
thanks for the tutorial.. I was reading your intro and that's me. I just started to wrap wire and I'm not doing a great job at least I don't think so ... thanks again.. Love the earrings..
ReplyDeleteGreat first tutorial! Lots of photos which helps.
ReplyDeleteMarilynmac, Your welcome...I'm glad you enjoyed it. Yeah...wirewrapping is tough at first. I used to freak if I got one little kink in the wire, and felt like I had to start all over again. But then I'd trudge on to the finish and it always looked a lot better than I thought it would. It takes time and practice (which I still need), but after a while you realize the wire is tougher than you think, and those kinks don't bother you as much. That cheap base metal wire on a spool is a great way to practice and to try a new design.
ReplyDeleteThanks for the feedback, Pearl. I'll do better on the photos next time, especially the ones at the end. BTW, I love your blog!
ReplyDeleteThis comment has been removed by the author.
ReplyDeleteYour pinch ball earrings is an awesome inspiration! Many thanks for sharing. I would like to feature your designs at http://www.handmade-jewelry-club.com/
ReplyDeleteContact me here if you have a concern.
Jane
http://diylessons.org/