Tuesday, August 13, 2013

A Few Photos

As promised, here are a few photos of pieces I've made:


I created this with the help of Kate McKinnon's book, "Sculptural Metal Clay Jewelry", by and large the most fun book ever written on the subject...it's full of the most ballsy, in-your-face, hefty PMC pieces I've ever seen. 


.
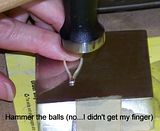
Yes...It's a finger. My Finger. This had to be the most fun I've ever had working with PMC.  I used Cold Mold compound from Rio Grande, item 701-042 to make a mold of my index finger, pressed the PMC into the mold, and fired it up in the kiln.  I wore it to work on Halloween 2012 (not 20012 as it says in the picture...too far into the future).  Maybe this year a necklace of fingertips
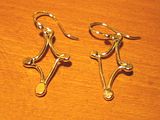
I've also explored fold forming during the past couple of years.  It may be a little rough on the fingers, but it give me some of the most serendipitious results...you know, happy accidents.


Fold forming is the technique that really makes me feel like a hard-working, kickass craftsperson...kinda like the village blacksmith.  There's annealing, quenching, folding, annealing again, quenching again, unfolding, pounding with numerous types of hammers, annealing, quenching, unfolding....and on and on till I get the look I want...Aaaaarrrrgggg! (picture here a muscle-popping blacksmith pumping a bellows and pounding a hunk of iron at the same time...yeah...that's me).
 
Wendy Edsall-Kerwin's blog Hammermarks is the go to site for fold-forming enthusiasts (at least as far as I'm concerned).  She's the person who turned me on to the chasing-on-air method of fold forming.  Wendy not only creates one-of-a-kind jewelry pieces using this method, but also makes very interesting sculptural bowls and wall art pieces.  Oh, and did I mention she has an Etsy store? You can get there through a link on her blog...just tell her Betsy sent you.
 
If you're serious about learning this method of manipulating metal, the go-to book on the subject, "Foldforming" by Charles Lewton-Brain is the best there is on the subject.  Might be the ONLY book there is for all I know.  When I first became interested, I found it pretty hard to find information on the subject.
 
Let me know about your own experience, if any, with fold forming...we'll share ideas and maybe Pinterest boards and other sites.  And BTW, I'm still learning my way around Pinterest, so go easy on me.   


Thursday, August 8, 2013

It's Been a Long Time!

I'm baaaaack!

I know...it's been awhile. Literally.  I haven't wrote a thing since 2009.  And I apologize for that.  But apologies are like wind, just like excuses. So, because I'm full of them, I'll name a few...health blip, lack of mojo (is that another term for laziness?),too much work at the hospital, and too much home remodeling.  Oh, and here's another...too ashamed to start writing because of how long it's been.  But I have to start somewhere.

Now that that's out of the way, I hope you guys aren't too pissed at me.

A lot has happened since then.  A great bead shop sprung up in my town, Johnstown, NY...Black Bear Beads...run by talented jewelry maker Jamie Levendusky...but, alas, closed just last year.  Had a blast teaching and learning there.  I took a PMC stone-setting class from none other than Holly Ginsberg-Gage, and I taught a few fine silver fusing classes there myself...good times!

I also learned a lot about working with PMC from Nancy Miller at her studio in Saratoga, NY.  Thanks Nancy!

There will be more to come soon...I wanted to post some photos, but Google has me ripping my hair out trying to upload the right ones. So much so that I'm considering moving this blog to Wordpress.  I've been assured that if I do, nothing, including my links to my fav blogs, comments, and followers, will be lost.  Everything will still be there.  We'll see...need to research more.

I hope this post finds you all well and in good spirits! 


Thursday, September 3, 2009

A Few More Examples of My Work: New and Old

It's been awhile, hasn't it!  I hope you like the new look and feel of my blog.  I changed templates because the old one was giving me a kind of squeezed-in feeling.  This one has (and hopefully you'll agree) a more expansive atmosphere.

I decided to play around with my oldest digital camera, my Nikon Coolpix 800.  Even though it eats batteries by the landfill-full (say that ten times real fast) this thing is a real workhorse (as long as it's plugged in), and one of the most honest cameras I've come across.  And by honest I mean that it gives no quarter to an object with flaws.  Sometimes it's too honest.  It was great when I used to sell antique pottery and porcelain on Ebay, where you really want to be up front about chips and cracks.  Trust me, this baby showed everything.

So I tried it on some of my jewelry...and here are some of my beauties:

 
This is a free-form pendant I made by wrapping a tight ball of paper towel with 16 gauge wire, ripping out the towel, and pounding it into a doming block.
  
This is a link necklace I made from (roughly) directions from a back issue of Art Jewelry Magazine.  Although it was a real pain to make, it gets me a lot of compliments.
  
These lovelies were super easy to make, but I think I'll add a few more pearls, mostly the white briollettes.


I don't do much antiquing, but I had to with these hoops in order to see the rugged edge and the wrapping.

Friday, August 7, 2009

My First Tutorial: Pinched Ball Earrings


These earrings are enjoyable to make and lend themselves to a variety of designs. And, since this is my first tutorial, I'm counting on you guys to give me some constructive feedback.

Important Note: This tutorial is written for those with experience in the use of a torch and the knowledge of the safety measures that come with using it.
Materials:
  • 16 gauge round, fine silver wire
  • 20 gauge round, fine silver wire for the earwires, or you can use ready-made ones from your jewelry supply shop
Tools:
  • 9/8 inch diameter hardwood dowel
  • Good quality flush cutter
  • Torch (I use the butane microtorch...also used for creme brulee)
  • Soldering block
  • Wooden block with a 1/4 inch mandrel fixed into it (you can use a 1/4-inch screw and saw off the top like I did)
  • 1 narrow-diameter nail, approx. 2mm
  • Jeweler's hammer
  • Steel block
  • Tumbler with steel shot and original Dawn dish liquid

  1. Wind the 16g wire around the 9/8-inch dowel twice to make 2 rings. Slide the coil off . Cut two rings with a flush cutter.
  2. Now look at the opposing ends on each ring you just cut. One end is flat across, the other is in a wedge or pointy shape. You need to cut this pointy shape so it is also flat across. Use the flat side of the flush cutter to cut this end flat, or flush (you don't need to cut in too much).
  3. Butt these ends together to form the ring. Make sure there aren't any gaps. Place carefully on the soldering block (take your time with this) and fuse this joint closed. Let the ring cool on its own. Side Note: If you're not sure how to fuse, I highly recommend an online course by Iris Sandkuhler of Sandkuhler Studio called "Fused Loop Pendants and Stackable Rings". That's how I learned, and I've been having a blast with fusing ever since.
  4. With two thin, metal rods of the same diameter, stretch the ring into an oval shape.
  5. Squeeze one end of the oval together with flat-nosed pliers until the sides touch each other. Squeeze the other end together, but just before the sides touch each other. This will be the end that hangs from the earwire.
  6. Use the torch to form a ball at the end where the sides are touching each other. It's best to do this with the earrings next to each other so you can try to make the balls approximately the same size. Let them cool on their own.
  7. Gently pry the sides apart and fit the open shape over the 1/4-inch mandrel. Pound the narrow-diameter nail through the earwire end. Just in front of the nail, squeeze the wire together to shape the hole for the earwire. Gently pull out the nail, and pull the earring off of the mandrel.
  8. Hammer the balls on both sides against the steel block until they are to your liking. This step really shines them up. Add the earwires.
  9. Place the earrings in a tumbler with some steel shot, water just 1/2 inch above the shot, and a squirt of the original Dawn dishwashing liquid. Tumble for as long as you want. I tumbled mine for around 6 hours total, and they were nice and hard.
  10. Alternate Finish: If you prefer, or if you don't own a tumbler, you can hammer the entire earring to harden it. This will give it a lot of shine and flash.
You can do some really cool things to these earrings, like drill a hole in each hammered ball and hand pearl briolettes or other beads. Or pinch more wire and ball those up too, like I did with these other earrings. Let your imagination run wild!

Sunday, July 26, 2009

What is Your Jewelry-Making Music?

You've got to be careful about the kind of music you play in the studio. Yeah, you know what I'm talking about...dancing when you're supposed to be working and creating your beauties. You don't think anyone else knows because you're all alone in your studio (at least I am) and you don't think anyone else knows because no one can see you...but I know. Because I do it too.

Walking on the rail trail today I got to thinking (danger!) how some tunes on my Ipod are perfect for walking, some for a slow jog, and some for an all-out sprint. Then my thoughts turned to my studio and I tried to get an idea of the perfect tune mix for the jewelry making tasks waiting for me there. Note to self...good luck with that. My musical tastes are all over the map.

I'll just stick to my favorite playlist and try to exercise some self-control...let's see.

More notes to Self
  • Ray of Light, by Madonna
  • Crazy, by Knarls Barkley
  • Adouma, by Santana (with Seal on vocals)
While listening to the any of the above, remain seated (if you want to get anything done) and continue to string cord, hammer silver, fuse or solder. May tap feet or kick leg, except when using foot pedal for flexshaft. And Do Not file to the music!

  • Working Class Hero, by John Lennon...performed by Green Day
  • The Likes of You Again, by Flogging Molly (or anything by Flogging Molly)
  • Sound of a Gun, by Audioslave (or anything by the short-lived group)
While listening to the above music, do not, I repeat, DO NOT perform any hammering or forging tasks. You'll know what I mean when your 22 gauge silver sheet becomes 30 gauge just because you had to keep time with the amazing back beats (my apologies to Chris Cornell, Tom Morello and the rest of that amazing group). And Working Class Hero...well, being that I belong to a labor union, I just have to get my solidarity-feeling, self-righteous anger on. But with no way to direct it except towards the silver I'm pounding on...then the song is over, and I've got an overworked piece of metal.

  • Business Time, by Flight of the Conchords
While listening to this, Do Not laugh. I don't need to tell you the consequences of losing the focus of your flame.

  • Bittersweet Symphany, by Verve Pipe
  • Clocks, by Cold Play
  • I Will Possess Your Heart, by Death Cab for Cutie
  • Tranquilize, by The Killers (with Lou Reed...remember him?)
All of the above songs are CERTIFIED OK by me to listen to while you make your jewelry. The only danger is that you might stop what your doing to actually listen...and that isn't very productive, is it. Also, Bittersweet Symphany can become a little hypnotic, so watch your flame!

Sometimes I just let the radio do the choosing for me. My favorite is 102.7 WEQX in Manchester, Vermont. They play a great mix of alternative and rock. If I don't like what they're playing, I'll switch to Exit 97.7 out of Amsterdam, New York. They play lots of music that I've never heard before, and they have a program called "Echoes" hosted by John DeLibretto. the music is very haunting and relaxing...I'd call it "New Age", but it's something more than that. In fact, it's on right now, so just click on the link to see what I mean.

Let me know what your favorite jewelry-making tunes are...I might be missing some great music in my studio!


Thursday, July 23, 2009

A Few Examples of My Work


Here are some photos of jewelry I've made in the past few years...for your viewing pleasure.

Tuesday, July 21, 2009

What Really Goes Into a Handmade Piece of Jewelry?

The last 2 years of the almost 20 years I've been making jewelry are the years that I've seriously called myself a jewelry artist. I believe what kept me from looking at myself in that light is the fact that I spend more time working at my "real" job than I do in my studio.

I began to realize that I, and any one of you reading this blog (or not reading it), is a true artist in your own right. I don't care if you're forging silver and gold with expensive tools, stringing beads onto a simple leather cord, or firing a lampwork bead...what you're doing is a necessary artistic expression of what was in your soul. And I say necessary because you feel like you'll climb the walls if you don't express yourself...it's almost like eating or drinking. Then you made a beautiful piece of wearable art and you stood back and you just can't stop admiring it because it came from your head and your heart.

Then, you give it to a loved one as a gift and try to act modest when everyone is Oohing and Aahing over it (I know, it's hard) and you hope they appreciate that you put your heart and soul into it and maybe got a few cuts and scratches along the way. We do suffer for our art.

And if they don't, it doesn't matter...you know, and all your fellow jewelry artists know. And you had a good time making it.

What is it "They" say (yes, the ubiquitous "they")? It's not the destination...it's the journey.